UV Mapping
As discussed in the previous exercise, simply applying a 2D image to a 3d object can cause issues. The UV mapping tool allows the textures to be projected from different source shapes. Following the notes, I have applied the moth texture to different shapes:
As discussed in the previous exercise, simply applying a 2D image to a 3d object can cause issues. The UV mapping tool allows the textures to be projected from different source shapes. Following the notes, I have applied the moth texture to different shapes:
The box projection has resulted in the image being being projected onto every side separately. The image fits perfectly on each face due to the projection box being the exact shape of the object. This will be useful on the main body of the AT-AT as this is made of up flat faces as part of one large box.

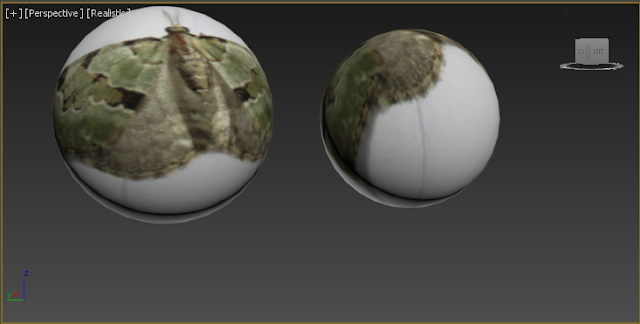
The left sphere uses a spherical projection shape. This option has projected it as though it was a flat surface of a box but of course this has resulted in the image bending round the sides. If the white section is turned transparent, this may bw useful to make the wings appear they have moved for an idle prop. The 'shrink wrap' tool has taken the two sides of the texture and made them meet at the bottom resulting in the moth being stretched around the top. This is not useful for the moth but would work with a seamless texture such as the metal surface of R2D2's head.
The result on both cylinders is the same on the height segments; the moth texture wraps around and meets back at the starting edge. With the 'cap' option selected the texture has been applied on the flat surface similar to the result of a box or 'planar' projection. This may prove useful for the cylindrical guns on the snowspeeder and has the flexibility to apply the texture to the end of the barrel if needed.

The face projection option has tiled the image on the surface in the same manner as the checker material did in the previous exercise. While potentially useful on the main section of the teapot - and indeed any complex shapes on my models that needs a seemless texture -the same issues as before arise with stretching on the spout.

To create the effect shown in the notes of the moth over the top and sides I looked at previous results on primitive shapes. The sphere option seemed most appropriate as the moth wings do not touch at the bottom. The more complex the same, it is evident the more stretching will occur however.

Offseting a box shape for projection worked best for applying the texture on opposite sides with minimal bleeding. While this mostly works on the sides, the image is applied to the complex parts like the spout and handle and the face behind them resulting in a strange and undesirable result.

The images below show the result of combing procedural maps to create a cloud effect. Using a combination of preset materials and tweaking settings to create variation, a realistic cloud effect has been created. The step concerning render settings has also taught me about setting background colour which will be useful for the snowy atmosphere of Hoth - the planet my scene is set on. I created a pyramid on a sandy plane for contrast.


Review of clouds
Good parts:
- Transparency adds to detail and quality and allows the detail to be seen when looking down, and the sky when looking up
- Uses a combination of preset maps and hence does not require artistic skill to make
- Many settings allow for variation in spacing and size and makes a for a realistic appearance
- By simply changing the background colour to blue, a realistic sky has been created with the clouds
- Requires a lot of scaling up to cover field of view, though this may be solved by using a different type of camera or technique
- Long process to create extra detail for the scene but can be used in any scene once made by importing
No comments:
Post a Comment